For fabricators serving spec-driven industries like trailer OEMs, switchgear builders, and structural steel shops, that distinction matters more than most. Parts often go straight from the laser table to welding, painting, or final assembly. There's no room for dross, burrs, or striations to slip through.
This guide breaks down the exact steps, key parameters, common mistakes, and troubleshooting fixes you need to consistently pull clean, weld-ready edges off your laser cutter — and how to tell when the machine itself, not your settings, is the problem.
Key Takeaways
- Edge quality is cumulative: prep, parameters, gas, and maintenance all matter together.
- Material composition and surface condition often outweigh machine and operator variables.
- Dross, burr, and striations usually fix with small gas, focus, or feed-rate tweaks.
- Thicker plate shows more striations and wider tolerances — adjust expectations by gauge.
Step-by-Step Tips to Improve Edge Quality in Laser Cutting
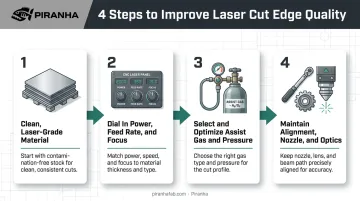
Edge quality doesn't come from one magic setting. It builds across four checkpoints: material, machine parameters, assist gas, and machine condition. Skip one, and the other three won't save the cut.
Step 1: Start With Clean, Laser-Grade Material
Before material ever hits the bed, confirm it's:
- Flat, with no warping or crowning
- Free of rust and mill scale (especially critical for hot rolled steel)
- Clean of oil, grease, or protective coatings
Low-grade or dirty steel reacts unpredictably once oxygen assist gas hits it. The oxidation reaction that's supposed to help cut faster instead becomes inconsistent, producing uneven dross and rough spots that have nothing to do with your machine settings.
Step 2: Dial In Power, Feed Rate, and Focus Together
These three variables move as a unit, not independently. Set laser power first based on material thickness and melting point, then match feed rate to it. Push feed rate past the sweet spot for your power setting, and the cut becomes unstable fast.
Fiber-laser manufacturer Mazak recommends tuning in a specific order: focus first, gas pressure second, feed rate last (Mazak Optonics, 2020). Adjust focus in roughly 0.020-inch increments, gas pressure in 5-10% steps, and feed rate in 2-5% steps.
A good focus window typically runs about ±0.020 inches around the ideal value. Note that increasing feed rate narrows that acceptable focus range, so faster cutting demands tighter focus control, not looser tolerances.
Step 3: Select and Optimize the Right Assist Gas and Pressure
Gas choice depends on the metal:
| Gas | Best For | Edge Effect |
|---|---|---|
| Nitrogen | Aluminum, brass, copper, stainless | Prevents oxidation; minimal-burr, oxide-free edge |
| Oxygen | Carbon and mild steel, when speed outweighs finish | Wider kerf; leaves flaking oxide behind |
Piranha-Whitney's 12kW CNC fiber laser systems use nitrogen cutting specifically to eliminate that oxide edge, which cuts out downstream cleanup for shops that can't afford secondary finishing on every part.
Pressure matters as much as gas type. Nitrogen's job is to physically eject molten material through the kerf, and both pressure extremes create defects.
Too high with low focus causes hanging dross; too low with high focus causes buildup starting above the bottom edge. Adjust in small increments and re-check the cut each time.
Step 4: Maintain Beam Alignment, Nozzle Centering, and Optics Cleanliness
Rough edges on just one side of a cut almost always trace back to alignment, not power. Check:
- Nozzle centering: The beam must pass through the exact center of the nozzle opening
- Head verticality: The laser path needs to be perpendicular to the material
- Optics condition: Dirty lenses and mirrors shift focus point and degrade cuts gradually, not all at once
Debris buildup on optics doesn't announce itself. It creeps in over weeks, slowly widening kerf and roughening edges until someone finally traces it back to a dirty lens.
Key Parameters That Affect Laser Cut Edge Quality
Even with clean material and a well-maintained machine, edge outcomes depend on how well you balance the following four variables.
Power
Power determines how much energy melts through the material. Too little, and the cut doesn't fully penetrate. Too much, and excess heat creates burr and warping.
- Higher power suits thicker material and faster cutting speeds
- Lower power suits fine detail work and tighter tolerances
Frequency and Duty Cycle
Duty cycle controls how long the beam stays active per pulse versus how much time it has to cool between pulses.
- Increasing the duty cycle adds heat, raising the risk of warping or discoloration
- Reducing it improves precision on thin or intricate cuts, where heat control matters more than speed
Feed Rate
Feed rate has to match power output. Push it too fast for your power setting, and cuts become incomplete or unstable. Shape complexity changes the equation too — straight-line cuts tolerate higher feed rates, while tight arcs and corners need the machine to slow down.
Material Thickness and Type
Thicker material shows more pronounced striations where the molten zone meets the cooler surrounding metal. That's physics, not a settings failure.
A 2002 TWI study tested 12 carbon and C-Mn steels at 6mm and 12mm thickness under identical CO2 laser parameters. At 12mm, material composition and surface condition affected roughness and edge squareness roughly twice as much as machine and operator variables combined.
Silicon content, specifically, improved roughness but worsened squareness. That's a reminder that even a perfectly tuned laser can't fully compensate for inconsistent raw material.
The practical takeaway: shift your quality expectations by gauge. A hairline-tight tolerance that's realistic on 10-gauge sheet isn't realistic on 1-inch plate, no matter how good your machine is.
Common Mistakes and Edge Defects (And How to Fix Them)
Most "mystery" edge problems trace back to one of a handful of repeatable causes. Here's the quick diagnostic:
| Problem | Likely Cause | What to Check |
|---|---|---|
| Rough edge or dross on one side | Beam misalignment, blocked/non-round nozzle, head not perpendicular | Verify beam centering, inspect nozzle, confirm head verticality |
| Kerf too wide or excessive striations | Gas pressure or focus set too high, power too strong for material | Reduce gas pressure and focus incrementally; match power to thickness |
| Burnt or overheated corners | Heat accumulation as beam slows to navigate the corner | Apply a power curve or cooling point at corners |
| Hard slag or oxidation underneath | Insufficient gas pressure, wrong focus height, or impure nitrogen | Increase gas purity/pressure; readjust focus and cutting height |
Field notes from real-world cuts:
- Stainless steel with nitrogen: Irregular striations paired with plasma or a bright green glow usually mean focus is set too low, pressure is too high, or feed is running too fast.
- Aluminum: Hard, pointy dross often traces back to an excessive nozzle gap rather than gas settings alone.
The fix pattern is almost always the same: small, incremental adjustments, checked one at a time.
Change gas pressure and focus one at a time. Adjust both simultaneously, and you'll never know which setting solved—or caused—the problem.
When Equipment Limitations Are the Real Problem
Sometimes the settings aren't the issue. No amount of parameter tuning fixes edge quality problems caused by an aging laser source, worn optics, or a machine that's simply underpowered for the material you're running now.
Signs it might be time to upgrade:
- Inconsistent cuts despite following a regular maintenance schedule
- Inability to hold tolerance on thicker gauges you used to cut cleanly
- Production volume has outgrown your current laser's capacity
- You're troubleshooting the same edge defects month after month with no lasting fix
If any of that sounds familiar, the equipment, not the operator, is likely the bottleneck. When that's the case, what you look for in a replacement matters as much as the decision to upgrade.
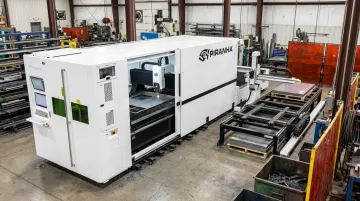
Piranha's fiber laser cutters are built with automation in mind from the start, so a shop can add material loading and unloading now or scale into it later without replacing the machine. Units are available in-stock for fast delivery.
Piranha also backs every system with U.S.-based service and same-day parts shipping from its Belvidere, IL facility, so fabricators aren't stuck waiting on overseas support while a production line sits idle. Purchase, lease, and financing options are available on select machines too, which helps when the case for upgrading is clear but the capital budget needs flexibility.
Conclusion
Consistent edge quality doesn't come from one setting or one fix. It comes from stacking the fundamentals: clean material, correctly balanced power and feed rate, the right assist gas at the right pressure, and disciplined machine maintenance. Most defects, from dross to striations to burnt corners, are diagnosable through small, incremental adjustments rather than guesswork.
But when the equipment itself becomes the limiting factor, tuning alone won't help. At that point, a manufacturer who understands the whole workflow matters as much as the settings do. Piranha builds its fiber laser systems with a full-shop perspective and U.S.-based support behind them.
Frequently Asked Questions
Does laser cutting leave sharp edges?
Laser cutting can leave a fine burr or slight dross rather than a perfectly sharp edge. Many shops deburr or apply secondary finishing to smooth it fully, though not every application requires it.
Which laser type cuts metal best: fiber, CO2, or diode?
Fiber lasers are now the industry standard for metal fabrication, cutting faster and more efficiently than CO2 systems. CO2 still handles a broad range of material types, while diode lasers suit lighter-duty, thinner-material work due to beam-quality limits.
What is dross in laser cutting and how do you remove it?
Dross is molten metal from the kerf that solidifies before it's fully evacuated, not always oxidized residue. It's typically removed with abrasive pads, grinding, or a mechanized deburring process.
How does material thickness affect laser cut edge quality?
Thicker materials show more pronounced striations and require wider tolerance bands. Power and focus settings need adjustment as gauge increases to maintain a clean cut.
What assist gas gives the best edge finish?
Nitrogen produces cleaner, oxide-free edges on reflective and soft metals like aluminum, brass, and stainless. Oxygen is preferred for faster cuts on carbon and mild steel, though it leaves an oxidized edge.
How often should I clean my laser cutting nozzle and lens?
Cleaning frequency depends on cutting volume and material type. High-utilization shops should inspect lenses after every shift and check nozzles regularly to catch debris before it affects cut quality.