Introduction
Bending half-inch steel plate is a different animal than folding 16-gauge sheet metal on a light-duty brake. It's a staple of trailer manufacturing, structural fabrication, and heavy enclosure work, but the margin for error shrinks fast at this thickness.
Get the tonnage wrong, pick the wrong die opening, or skip a test bend, and you're looking at a cracked plate or an angle that's off by several degrees. Required bending force scales with the square of plate thickness, so doubling thickness doesn't just double the force needed. It roughly quadruples it, according to Bystronic's tonnage calculation guide. That's why a machine that handles 3/16" sheet without effort can stall completely on 1/2" plate.
This guide covers the steps for bending 1/2" plate, the equipment you'll need, and the parameters that make or break the bend. It also covers when a press brake isn't the right tool for the job.
Key Takeaways
- Tonnage requirements scale with the square of plate thickness, so light-duty brakes won't cut it
- Cold bending handles most mild steel at 1/2"; save preheating for high-strength alloys or tight radii
- Minimum bend radius, springback, and grain direction decide whether a bend holds or cracks
- Most failures trace back to undersized tonnage, wrong die width, or a skipped test bend
How to Bend 1/2" Steel Plate
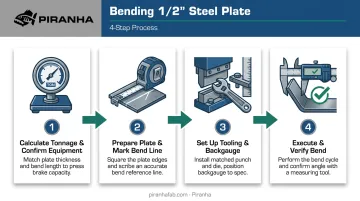
Bending 1/2" plate correctly comes down to four steps: sizing your equipment, prepping the material, setting up tooling, and executing the bend with verification built in. Skip any one of these and you're gambling with production stock.
Step 1: Calculate Tonnage and Confirm Equipment Capacity
Calculating tonnage means factoring in thickness, bend length, V-opening, and material tensile strength. The standard air-bending formula is:
Tons = [(575 × t²) / V / 12] × L, adjusted by a material factor for actual tensile strength (source: Bystronic).
For example, 1/2" mild steel with a 4" V-opening (the common 8x-thickness rule) works out to roughly 3 tons per inch of bend length. A 10-foot bend on that same setup pushes past 350 tons, well beyond what most general-purpose brakes are rated for.
Before you commit material:
- Confirm your press brake or plate roll's rated tonnage exceeds the calculated requirement for the full bend length, not just a sample section
- Verify die opening width is sized for 1/2" stock (commonly 6x to 8x thickness for steel)
- Check tooling load and centerline-load limits, not just the machine's headline tonnage rating
Piranha's hydraulic press brakes are built with the tonnage and bed length ranges that heavy-plate fabrication demands, so shops aren't stuck retrofitting or replacing equipment as jobs scale up.
Step 2: Prepare the Plate and Mark the Bend Line
Surface condition and orientation matter more at 1/2" than they ever did on thin sheet.
- Inspect the plate for consistent thickness, rust, or lamination defects before it goes anywhere near the brake
- Mark the bend line perpendicular to the rolling/grain direction whenever possible: bending parallel to the grain concentrates stress along the fiber lines and raises cracking risk
- Deburr thermal-cut or sheared edges and round sharp corners with a grinder before bending
- Decide on preheating based on material grade: mild steel rarely needs it, but high-strength or high-carbon plate at tight radii often does
Step 3: Set Up Tooling and Backgauge
Match your punch and die to the calculated V-opening and target inside radius for 1/2" material. Then set the backgauge for the correct leg length, but don't set it for the exact target angle. Build in extra angle to compensate for springback, since thicker, higher-strength plate springs back more than thin sheet does after the load releases.
Always run a test bend on scrap of the same thickness and grade first. This single step catches radius errors, angle drift, and tooling mismatches before they show up in production parts. Skipping it is one of the most common (and expensive) mistakes in heavy-plate work.
Step 4: Execute the Bend and Verify the Result
Apply controlled force while watching ram pressure and position. Heavy plate gives you less visual warning before something goes wrong compared to thin sheet.
- Bend to your compensated angle, not the final target, to account for springback
- Measure the finished angle against the target and adjust the backgauge or overbend allowance if it's off
- Inspect the bend zone for cracking, distortion, or surface marking before running the rest of the batch
If the first part checks out, you've validated your setup. If it doesn't, go back to Step 3 before touching more material.
What You Need Before Bending 1/2" Steel Plate
Preparation and equipment selection decide whether a heavy-plate bend succeeds on the first attempt or turns into costly rework.
Confirm these six essentials before you load the plate:
- A press brake or plate roll with tonnage and bed length rated for the full bend at 1/2" thickness, not just the machine's nameplate rating
- Punch and die tooling matched precisely to your required V-opening and inside radius
- Confirmed material certification (mild steel vs. high-strength alloy) since yield strength directly changes force and radius requirements
- Flat, defect-free stock of consistent thickness with mill scale and lamination issues addressed
- An operator trained specifically on heavy-plate setup, pinch-point hazards, and the higher forces involved compared to thin sheet
- Proper PPE and machine guarding, given the increased tonnage and injury risk at this thickness
Fabricators handling trailer components, structural brackets, or enclosures at this thickness often start on a general-purpose brake and outgrow it within a year or two. That's part of why Piranha builds press brakes and bending rolls sized specifically for this class of work.
Key Parameters That Affect Results
At half-inch thickness, small parameter errors get magnified into cracked bends, angle inaccuracy, or machine strain. Five variables drive nearly every outcome.
| Parameter | Why It Matters | Impact If Wrong |
|---|---|---|
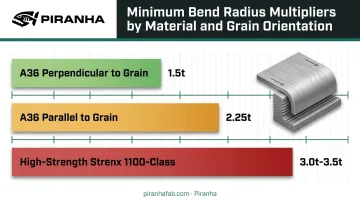
| Minimum bend radius | For ASTM A36 through 3/4", minimum inside radius runs about 1.5t perpendicular to rolling direction | Too tight a radius causes surface cracking, especially along the grain (AISC engineering journal) |
| Tonnage/press capacity | Undersized tonnage can't fully seat the bend across the full length of thick plate | Incomplete bends, inconsistent angles, or machine overload |
| Springback allowance | Thicker, higher-strength plate springs back more than thin sheet after unloading | Parts miss target angle unless overbent to compensate |
| Grain/rolling direction | Bending parallel to rolling direction concentrates stress along fiber lines | Increases cracking risk, especially at tight radii |
| Hot vs. cold forming | Some grades or radii require heat to bend without fracturing | Affects cycle time, tooling wear, and final mechanical properties |
A couple of these deserve more detail.
Grain direction penalty is real and measurable. The same A36 plate that bends safely at 1.5t perpendicular to the grain needs roughly 2.25t when bent parallel to it — a 50% increase in minimum radius just from orientation alone.
High-strength alloys change the math entirely. SSAB's bending guide for Strenx steel shows minimum punch radius climbing from roughly 1.5t-2.0t on 700-class plate up to 3.0t-3.5t on 1100-class plate, depending on orientation. Don't carry mild-steel tooling settings over to a higher-strength job without rechecking the chart.
Common Mistakes and Troubleshooting
Most failures at this thickness trace back to a short list of preventable setup errors:
- Underestimating tonnage for the plate's length and thickness, stalling the press or leaving the bend incomplete
- Selecting a die opening too narrow for 1/2" material, over-stressing both tooling and plate
- Skipping the scrap test bend, only discovering radius or angle errors after production material is already committed
Here's how to diagnose the two most common problems on the shop floor:
Problem: Cracking at the bend
- Likely cause: bending parallel to grain direction, or too tight a radius for the material grade
- Fix: reorient the part, increase the bend radius, or switch to hot forming for high-strength alloys
Problem: Inconsistent bend angle along the length
- Likely cause: uneven press pressure, backgauge misalignment, or unsupported plate sagging mid-bend
- Fix: verify machine leveling, recalibrate the backgauge, and support the full plate length evenly during the bend
Repeated occurrences of either issue point to a setup variable, such as die width, radius, or support, that needs to be locked down before the next run.
When to Bend 1/2" Steel Plate & Alternative Methods
Press brake bending isn't the right fit for every 1/2" plate project.
Press brake bending works best for:
- Straight-line bends, brackets, and structural or enclosure components
- Precise angles in low-to-medium production volume
- Repeatable bend angles across multiple parts in a single production run
It becomes inefficient when:
- You need large-radius curves or full cylinders
- Production volumes are high enough that continuous forming beats discrete bending
- Parts require multiple bend radii that call for frequent tooling changes
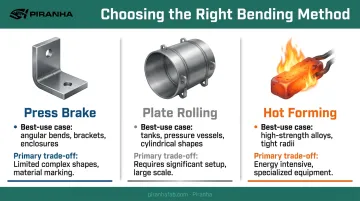
| Method | Best For | Trade-Off |
|---|---|---|
| Press brake (air bending) | Angular bends, brackets, enclosures | Limited to discrete bends, not continuous curves |
| Plate rolling | Tanks, pressure vessel sections, cylindrical shapes | Different setup entirely; not suited to sharp angles |
| Hot forming | High-strength alloys, unusually tight radii | Added time/cost for heating; can affect material properties |
Plate rolling and hot forming aren't competitors to the press brake so much as different tools for different geometry. If the job calls for a cylinder instead of an angle, no amount of brake tonnage solves that problem — you need a roll.
This is part of why Piranha's product line spans press brakes, bending rolls, and ironworkers under one roof. Fabricators handling both angular brackets and curved tank sections can scale into the right machine for each job without switching vendors or relearning a new manufacturer's support process.
Frequently Asked Questions
How thick of steel plate can you bend?
Heavy-duty press brakes and plate rolls commonly handle material well beyond 1/2", often up to 1" or more depending on tonnage. At 1/2", you're comfortably within standard heavy-duty equipment capability.
Is it better to bend metal hot or cold?
Cold bending is standard for mild steel at 1/2" thickness when tonnage and radius are set correctly. Hot forming is reserved for high-strength alloys or unusually tight radii that would crack cold.
What tonnage press brake do I need to bend 1/2" steel plate?
It depends on plate width, bend length, material yield strength, and die opening — there's no single number. Use a tonnage calculator or consult the equipment manufacturer for your specific job.
What is the minimum bend radius for 1/2" steel plate?
For mild steel like A36, minimum radius runs about 1.5 times the thickness when bent perpendicular to the grain. Higher-strength grades require a larger radius, sometimes 3 times thickness or more.
Do I need to preheat 1/2" steel plate before bending?
Usually not for mild steel. Preheating becomes relevant for high-carbon or high-strength alloys, or when you need a radius tighter than the material can handle cold.
How do you compensate for springback when bending thick steel plate?
Fabricators typically overbend slightly past the target angle to let elastic recovery settle the part into place. Bottoming or coining dies also reduce springback compared to standard air bending.