Introduction
Press brakes sit at the center of nearly every metal fabrication shop's bending operation. Trailer builders, enclosure manufacturers, and structural steel shops rely on them daily to turn flat sheet and plate into precise angles.
Running one correctly is trickier than it looks, though. Skip a setup step, misjudge your tooling, or ignore how a material springs back after bending, and you end up with scrap, rework, or a safety incident.
Demand for bending capacity isn't slowing down, either.
As more shops shift toward CNC-controlled brakes for repeatable, spec-driven output, knowing how to operate one correctly matters more than knowing which button starts the cycle. This guide walks through setup, operation, and shutdown under real shop-floor conditions.
Key Takeaways
- Press brakes form sheet metal through a punch-and-die process for repeatable, spec-driven angles.
- Confirm tonnage, tooling, and back gauge settings before the first cycle.
- Follow the sequence: setup, test bend, run, monitor, shutdown.
- Wrong die selection and skipped test bends cause most angle-accuracy problems.
- Shop consistency in setup and monitoring drives accurate, repeatable bends.
When Should You Use a Press Brake?
A press brake is the right tool for straight-line bends at a fixed angle in flat sheet or plate. It's not built for curves, continuous profiles, or extremely high-volume identical parts.
| Process | Best fit | Volume guideline |
|---|---|---|
| Press brake | Flexible, discrete bends; changing part mixes, short runs, prototypes | Low-to-moderate batches, often in the hundreds |
| Roll forming | Continuous profiles shaped progressively through rollers | Best for repeat runs of the same profile |
| Stamping | High-repeat parts from hard tooling and coil stock | Roughly 5,000-10,000 parts/year as a rule-of-thumb transition point |
Common misuse scenarios worth avoiding:
- Attempting bends beyond the machine's rated tonnage, which risks deflection or tooling failure
- Running material thicker than the installed tooling was designed to handle
- Setting up a full CNC program for a one-off job that doesn't justify the changeover time
Where Press Brakes Fit in the Fabrication Workflow
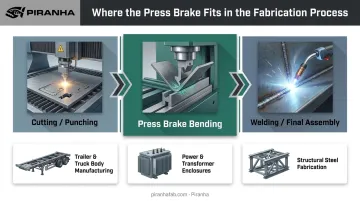
Press brakes typically run after cutting and punching (laser, plasma, or punch press) and before welding or final assembly. Where they sit in the sequence rarely changes, but how they're used does:
- Trailer and truck body manufacturing: chassis brackets and panels, often requiring tight tolerances on repeat parts
- Power and transformer enclosures: NEMA/UL-compliant boxes where squareness and consistent flange dimensions matter as much as the bend angle itself
- Structural steel fabrication: heavier gauge material and longer bend lengths that push tonnage requirements up considerably
Each of these applications carries different tonnage, material, and tolerance demands, which is exactly why tooling and machine selection shouldn't be an afterthought.
What You Need Before Using a Press Brake
Before you touch the controls, confirm four things. Skipping any one of these is where most bending problems start.
- Correct tonnage and bed length for the material and part width. Undersized tonnage produces incomplete bends or strains the machine over time. Piranha's press brake lineup spans roughly 35 to 3,000 tons across its P Series and T Series. Its online tonnage calculator can help match capacity to a specific job before you commit to a setup.
- A matching punch and die set. V-die, gooseneck, or hemming tooling needs to match both the bend type and the required inside radius. The wrong die opening for the material thickness is one of the fastest ways to crack a part.
- An accurate part drawing or bend program with bend allowance calculated. The K-factor locates the neutral axis through the material thickness, and it shifts with material type and bending method. An incorrect deduction here throws off final part dimensions before the first hit even happens.
- A trained operator or supervised trainee. Pinch-point hazards, back gauge programming, and emergency stop locations all need to be second nature. Many shops weigh this when choosing a machine partner. Manufacturers like Piranha pair equipment sales with U.S.-based training and after-sale guidance, rather than leaving operators to figure it out alone.
How to Use a Press Brake Machine (Step-by-Step)
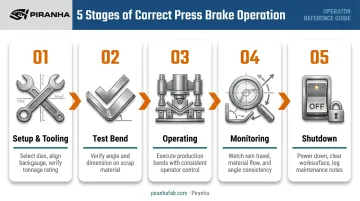
Correct press brake usage follows a defined sequence. Skipping steps like tooling checks or test bends is a leading cause of scrapped parts and premature machine wear.
Setup and Preparation
- Select and install the correct punch/die combination in the ram and bed, securing both before power-up.
- Set the back gauge to the programmed or measured distance for the first bend line.
- Double-check die opening against material thickness. A mismatched opening is a common setup error, and it causes cracking or an incomplete bend angle almost every time.
Initiating Use
CNC press brakes start by loading a bend program that defines sequence, angle, and back gauge position. Manual or hydraulic units rely on a foot pedal or palm-button activation instead.
Either way, always run a test bend on scrap or sample material first. Confirm angle accuracy before committing to the full batch. This single step catches most setup errors before they become scrap.
Operating the Press Brake Correctly
- Position material firmly against the back gauge and finger stops, keeping hands clear of the pinch point as the ram descends
- Maintain consistent pressure and tonnage settings across the entire run
- Stay within the machine's rated capacity to avoid deflection
Consistent ram speed and pressure directly affect repeatable angle accuracy across a batch. A brake running slightly under or over its intended tonnage on different cycles will produce parts that don't match, even with identical programming.
Monitoring During Use
Watch for springback, angle drift, or material slipping against the back gauge on every cycle, not just the first one. Signs of trouble include:
- Uneven bend lines from cycle to cycle
- Die marking on the finished surface
- Unusual noise that can point to misalignment or worn tooling
Catching these early prevents a small issue from turning into a batch of rejects.
Shutting Down or Completing Use
- Retract the ram to its home position
- Release hydraulic pressure fully
- Clear tooling and scrap from the bed
Skipping proper shutdown, or leaving tooling loaded under pressure between jobs, accelerates wear on the ram and die alignment over time. That five-minute routine costs far less than replacing a worn ram or misaligned die down the line.
Best Practices for Using a Press Brake Effectively
Good press brake operation comes down to consistent daily habits. A few practices separate shops that run consistent parts from ones that fight scrap rates every week.
- Run a test bend on scrap for every new job or material change, regardless of how experienced the operator is. Material behavior varies even within the same spec.
- Inspect and clean tooling before every use (not weekly or monthly), since cracked or dented tooling risks damage to both the machine and the operator. Swap out damaged dies before running production.
- Follow a preventive maintenance schedule for hydraulic seals, ram alignment, and back gauge calibration. A documented service history reduces unplanned downtime, and quick access to parts, such as Piranha's same-day shipping from Belvidere, IL, keeps repairs fast.
- Standardize bend programs and tooling setups for repeat jobs. It cuts changeover time and reduces the variability that shows up when different operators run the same part.
- Refresh safety training on light curtains, e-stops, and back gauge programming whenever a machine is upgraded or automation gets added. Muscle memory from an old setup doesn't always transfer cleanly to a new one.
Conclusion
Using a press brake correctly depends on disciplined setup, a test bend before every run, and consistent monitoring while the machine is cycling.
Pair that discipline with a reliable, well-supported machine (like the hydraulic press brakes Piranha builds and backs with U.S.-based service), and you've got the foundation for protecting part quality, throughput, and cost over the equipment's entire lifetime.
Frequently Asked Questions
How much does a press brake machine cost?
Pricing varies widely based on tonnage, bed length, CNC controls, and automation level. Piranha's online shop-builder tool lets you configure a press brake and get pricing matched to your production needs.
How thick of metal can a press brake bend?
Maximum thickness depends on tonnage, bed length, V-opening, and material strength, not thickness alone. Shop press brakes range from light-gauge sheet capacity up to heavy plate on higher-tonnage machines.
What is the rule of 8 on a press brake?
For air bending, Bystronic's tooling guidance recommends a V-die opening roughly 8 times the material thickness, then round to the closest available die. It's a starting point for sizing, not a substitute for checking the tooling chart.
What safety precautions should operators follow when running a press brake?
Keep hands clear of the pinch point, use light curtains and guards, and verify e-stop function before each shift. Never bypass safety interlocks, even for a "quick" job.
Can one operator run a CNC press brake alone?
Yes. Programmable back gauges and automated sequencing make CNC brakes single-operator machines by design. Larger or heavier parts may still need a second person for handling.
What's the difference between air bending and bottoming on a press brake?
Air bending uses partial die contact for flexible angles across fewer tools. Bottoming presses material fully into the die for a fixed, more precise angle with easier-to-predict springback.